There are three ways to translate a video. Translated subtitles put the new language on screen and keep the original voice. Dubbing replaces the speech with new speech in the target language. Lip sync goes one step further and re-renders the speaker’s mouth to match the new words. Choose by how visible the speaker is and how your audience watches. All three start from the same place: an accurate transcript of the original.
This guide is for translating a video you own or have rights to, for example a Spanish interview into English or an English tutorial into Japanese. It gives the steps in ChatCut, where all three outputs come from the same project, and points out where YouTube or another tool is simpler. Product steps were checked against official documentation on November 4, 2026.
Key Takeaways
- Pick the output first: subtitles for authenticity and many languages at low cost, dubbing when people listen more than they watch, lip sync when a face fills the frame.
- Fix the original transcript before you translate. A misheard name or number gets copied faithfully into every language.
- Translating speech doesn’t touch text that’s already in the picture, such as titles, slides or burned-in captions. Decide what to do with it before you start.
- In ChatCut, subtitle translation is a caption command. Dubbing and lip sync run through Video Translation, which shows you the transcript and a credit estimate before anything is generated.
- Have someone who knows the language check the result before you publish, or at least read a back-translation.
Choose how to translate a video
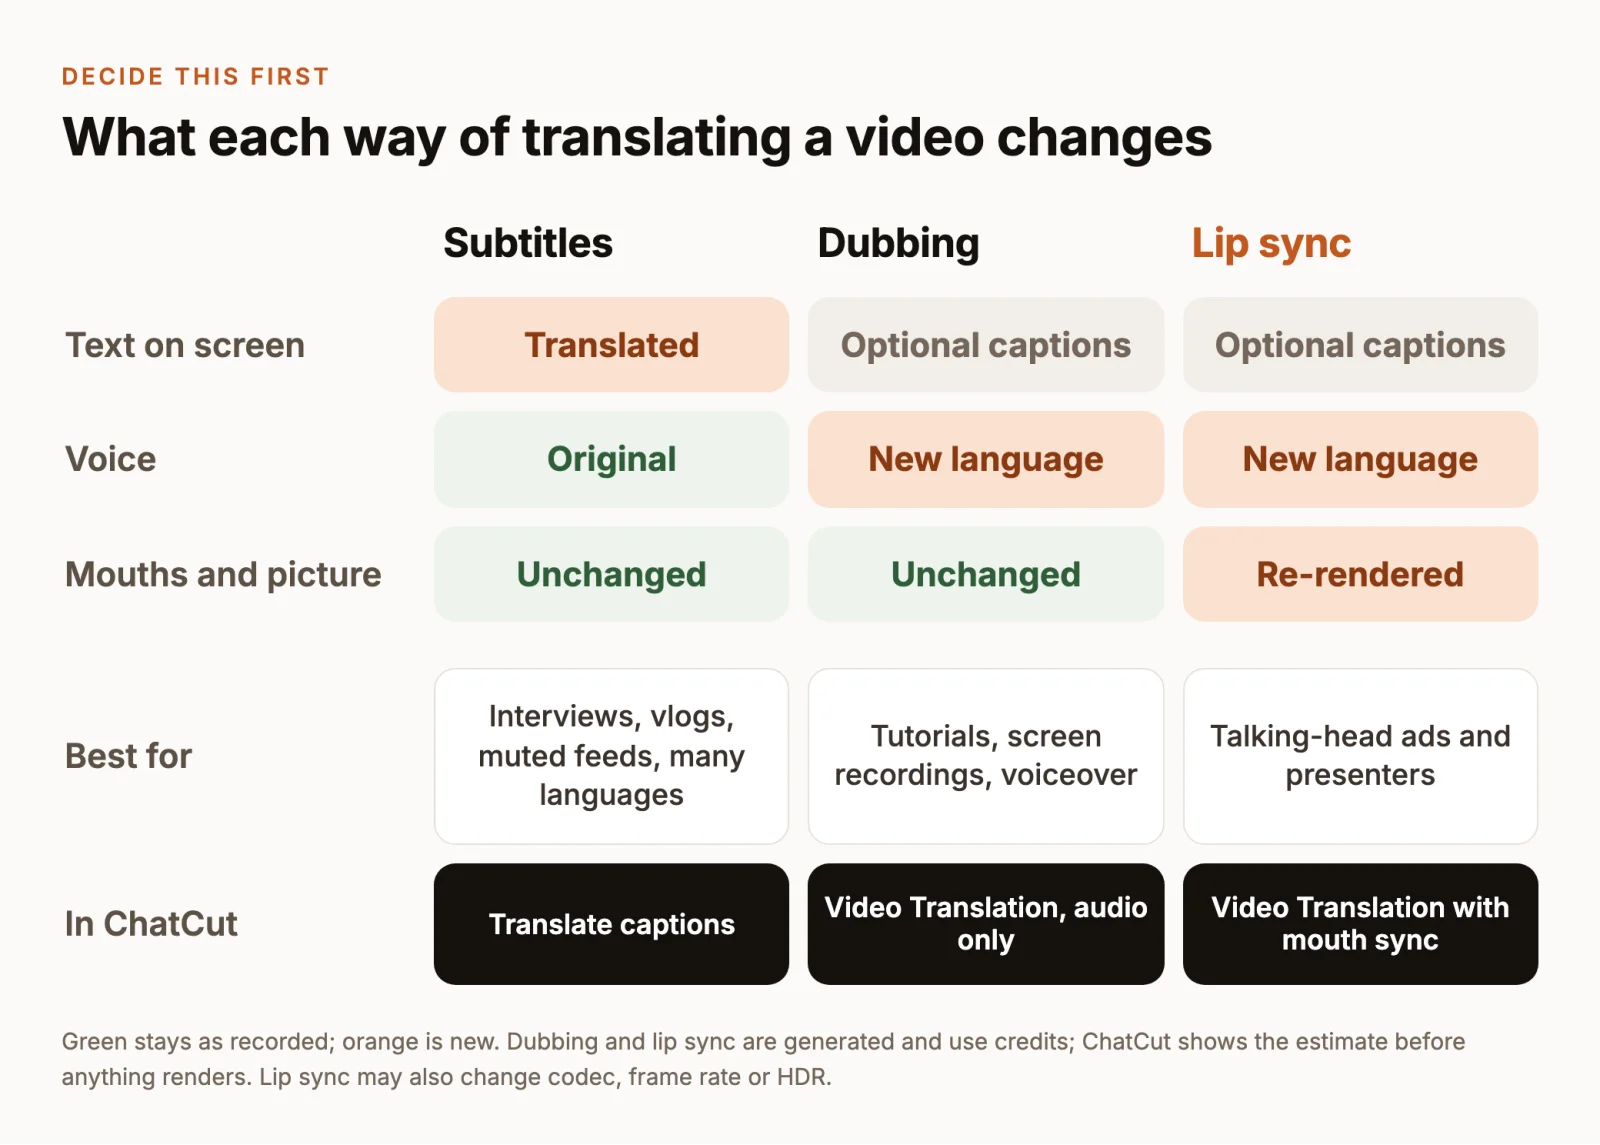
Subtitles are the cheapest and the most faithful. Viewers hear the real speaker, with their tone and timing, and read the translation. They suit interviews, documentaries and vlogs, and feeds where many people watch with the sound off. The cost is reading effort: fast speech means each line stays on screen only briefly.
Dubbing suits videos people listen to while they look at something else: tutorials, screen recordings, product demos and voiceover. When the speaker is rarely in close-up, nobody notices that the mouth doesn’t match the words.
Lip sync is for videos where the face is the content: talking-head ads, course presenters, a founder speaking to camera. It re-renders the picture, so there’s more to check and more that can change.
You can combine them. A common pattern is a dubbed version with translated captions for social media and a subtitled version for the long cut. To translate a video to English, every step below is the same; choose English, or a regional variant such as English (UK), as the target.
Prepare the source before you translate
Every route starts from a transcript of what’s said, and errors there are carried into every language. This step does more for quality than any setting later.
- Fix names, numbers and terms in the original transcript. Product names, people’s names, prices and dates are where speech recognition slips most often.
- Pick the exact target language. Spanish for Mexico and Spanish for Spain differ in vocabulary. ChatCut’s dubbing list, for example, offers regional variants such as Spanish (Mexico), Spanish (Spain), English (UK) and English (United States).
- Look for text in the picture. Speech translation leaves titles, slides, interface labels and burned-in captions in the original language. When ChatCut’s Video Translation Skill finds burned-in captions, it asks whether to cover them with the translation, place the translation where it doesn’t overlap, or leave the picture unchanged. Other on-screen text needs a manual edit.
- Cut out the part you need. ChatCut processes and bills the whole source video for dubbing and lip sync, so trim the section you want and export it as its own clip first (docs).
- Get permission. Translate only footage you have the rights to, and get the speaker’s consent before you dub them in their own voice.
Translate the subtitles and keep the original voice
If the video doesn’t have captions yet, create them first. Our guide to adding subtitles to a video covers generating, correcting and styling them in every major editor. Then, in ChatCut (docs):
- Turn captions on and open the right side of the split Captions control.
- Choose Translate captions, then the target language.
- When it finishes, a Translation (language) caption source appears. Edit it on its own; later corrections to the original keep your edited translation.
- To show both languages at once, ask the agent for bilingual captions. The Bilingual Captions Skill in the app sets this up with one shared style or a separate style for each language.
- Export. Export → Video burns the visible captions into the picture, and Export → Subtitles saves the active caption or translation track as an SRT or TXT file (export docs).
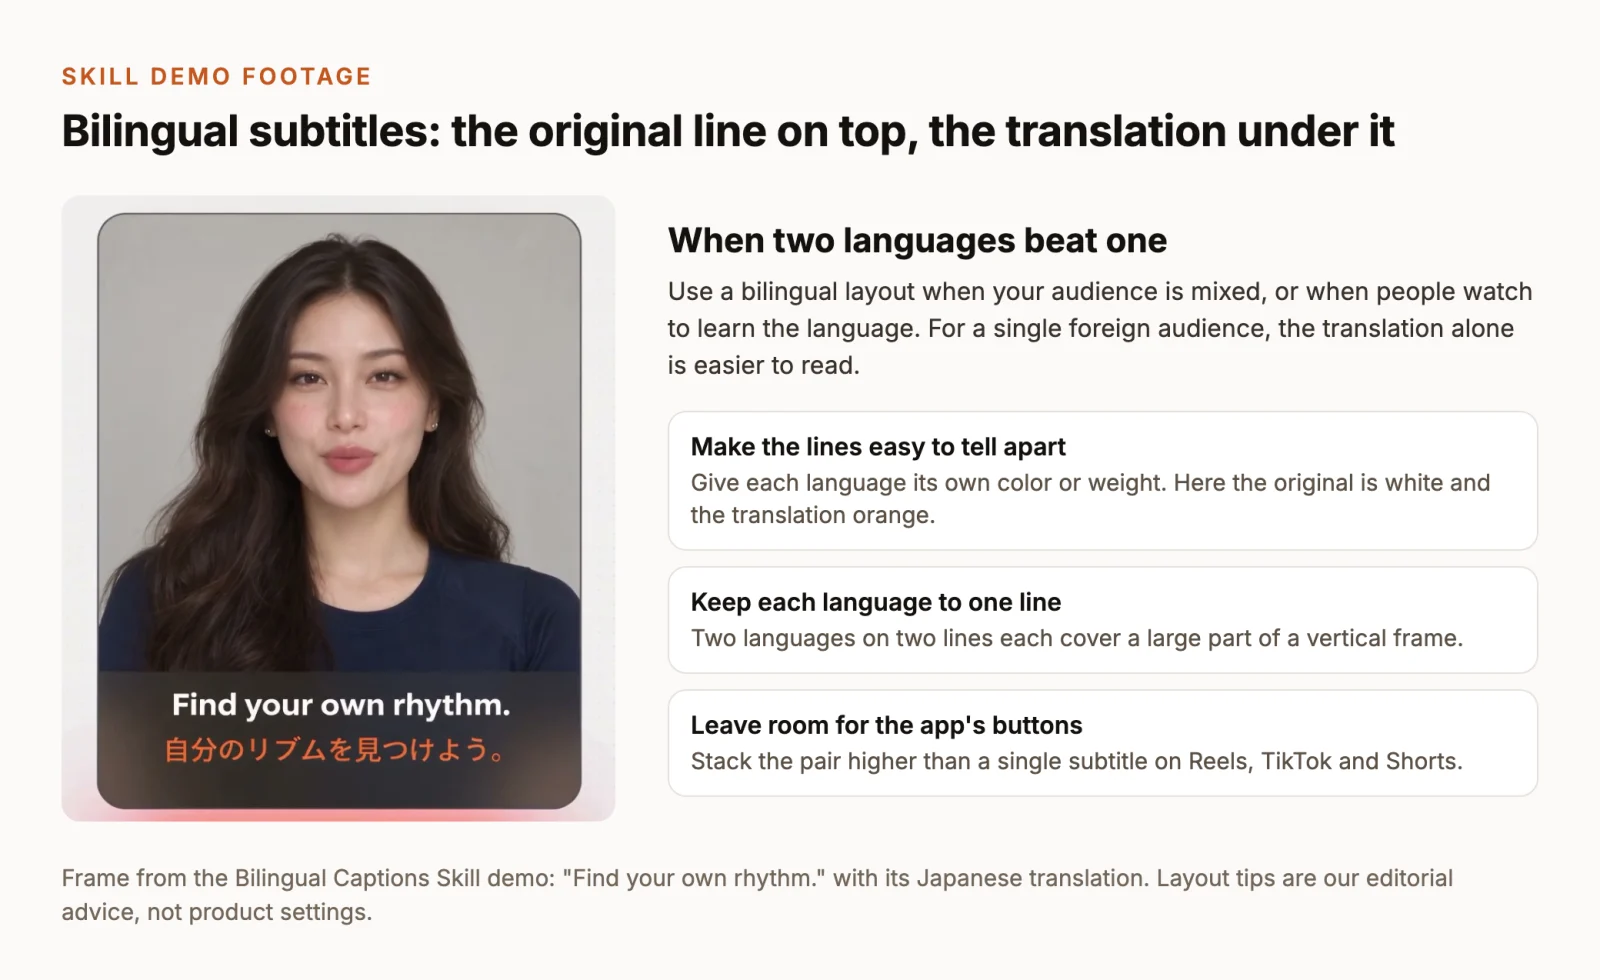
Two alternatives are worth knowing:
- YouTube: you can upload a translated SRT for each language in YouTube Studio under Subtitles → Add language; the subtitles guide has the steps. Viewers can also switch on Auto-translate in the player’s captions menu, but you don’t control that wording (YouTube help).
- Any editor: a translated SRT, from ChatCut or a translation service, can be imported into Premiere, DaVinci Resolve or CapCut on web and desktop and burned in there.
Dub a video into another language
Dubbing replaces the voice. In ChatCut, AI video translation runs through Video Translation, which can keep the original speaker’s voice in the new language and optionally add translated captions. Here is the Skill’s demo: one English recording, switched between English, Spanish, Japanese and Chinese versions.
The steps (docs):
- Import the source. Bring the whole video, or the section you exported, into My Assets.
- Start the job. Open the Video Translation Skill and choose the video and the target language. Or open the AI panel in Agent mode, type @ to mention the video, and describe what you want, as in the prompt below.
- Review the transcript. The agent shows the original-language transcript as editable text. Correct it and confirm. You can let it translate automatically or review the translation as well; you don’t need to speak the target language to approve the source.
- Approve the estimate. Before anything renders, ChatCut shows a confirmation with the treatment, the source duration and the credit estimate (generation credits).
- Review the new asset. The translated video arrives in My Assets as a new file, and your source isn’t replaced. Watch it through, then drag it onto the timeline.
For a dub that leaves the picture exactly as it is:
Replace @product-demo with your own clip: type @ and pick it from My Assets.
Translated speech rarely takes exactly as long as the original. Asking for the source’s exact length keeps the dub in step with your cuts, music and graphics, but the delivery can feel rushed or stretched. Letting the duration change slightly sounds more natural, but the video gets longer or shorter, so recheck anything timed to the original.
Two other routes, depending on where the video lives:
- YouTube automatic dubbing generates dubbed audio tracks after upload for eligible channels, and viewers can switch back to the original track. You can’t edit the dubs; if one is mistranslated because the video’s language was set wrong, correct the language and YouTube generates them again. Videos longer than 120 minutes, with little or no speech, or with very fast speech may not qualify (YouTube help).
- Descript dubs from AI Actions → Repurpose → Translate: choose languages, tick Dub speech, assign a voice to each speaker, and choose Regenerate dubbed audio after any text change (Descript).
Add lip sync when the speaker is on camera
Lip sync is dubbing plus a new picture: the mouth is re-rendered so it matches the translated words. Use it when a face fills the frame for most of the video. Skip it for screen recordings, edits heavy with B-roll, and voiceover, where dubbing alone looks the same and changes less.
Three things to know before you run it (docs):
- The picture changes. Lip sync re-renders the video, so alpha, HDR, codec, bitrate and frame rate may not stay identical to the source. If the picture must stay untouched, use the audio-only dub above.
- It doesn’t pick one face. Mouths are processed across the frames you send, without choosing a speaker. If two people are on screen, check both.
- It bills the full source. Like dubbing, it processes and charges for the whole clip, so trim first.
The prompt from ChatCut’s docs, with your own clip in place of @presenter:
Check the translation before you publish
A translated video can look finished and still say the wrong thing. Before it goes out, check:
- Meaning. Have someone fluent watch it. If nobody is available, transcribe the dub and machine-translate it back into the original language; changes in meaning show up quickly.
- Names, numbers and claims. Prices, dates, product names and promises should match the source exactly.
- Pronunciation. Generated speech often stumbles on brand and personal names.
- Speakers. In interviews, check that each voice belongs to the right person.
- Timing. Speech shouldn’t run over a cut or a graphic, and subtitles should stay up long enough to read.
- Faces. On a lip-synced version, watch every close-up at full screen, including people who aren’t speaking.
- Text in the picture. Titles, slides and old burned-in captions are still in the original language unless you dealt with them.
- Captions against the dub. If you caption a dubbed version separately, transcribe the dubbed audio rather than reusing an earlier subtitle translation, so the words on screen match what people hear.
- Sound under the voice. Make sure music and ambience in the original are still there where you want them.
When it passes, put the translated asset on the timeline, swap in anything else the new market needs, such as a translated title card or end screen, and export.